
Neutral Fall Decor DIYs with Sola Wood Flowers
Do you love Fall decor, but don’t love bright orange? I have some beautiful, neutral colored Fall decor DIYs for you. There will be pumpkins, but they will be toned down colors. Plus, I’ll share how to use Sola wood flowers to get an elegant Fall look, even if you’re on a budget.
I did a whole video unboxing my Fall decor and giving close-ups of those beautiful Sola wood flowers, so make sure to click below to watch the video.

// ombre flower pumpkin
Let’s get started on the first neutral colored DIY. We will be upcycling a project I made last year, because I already had the pumpkin in the perfect shape for this new project.
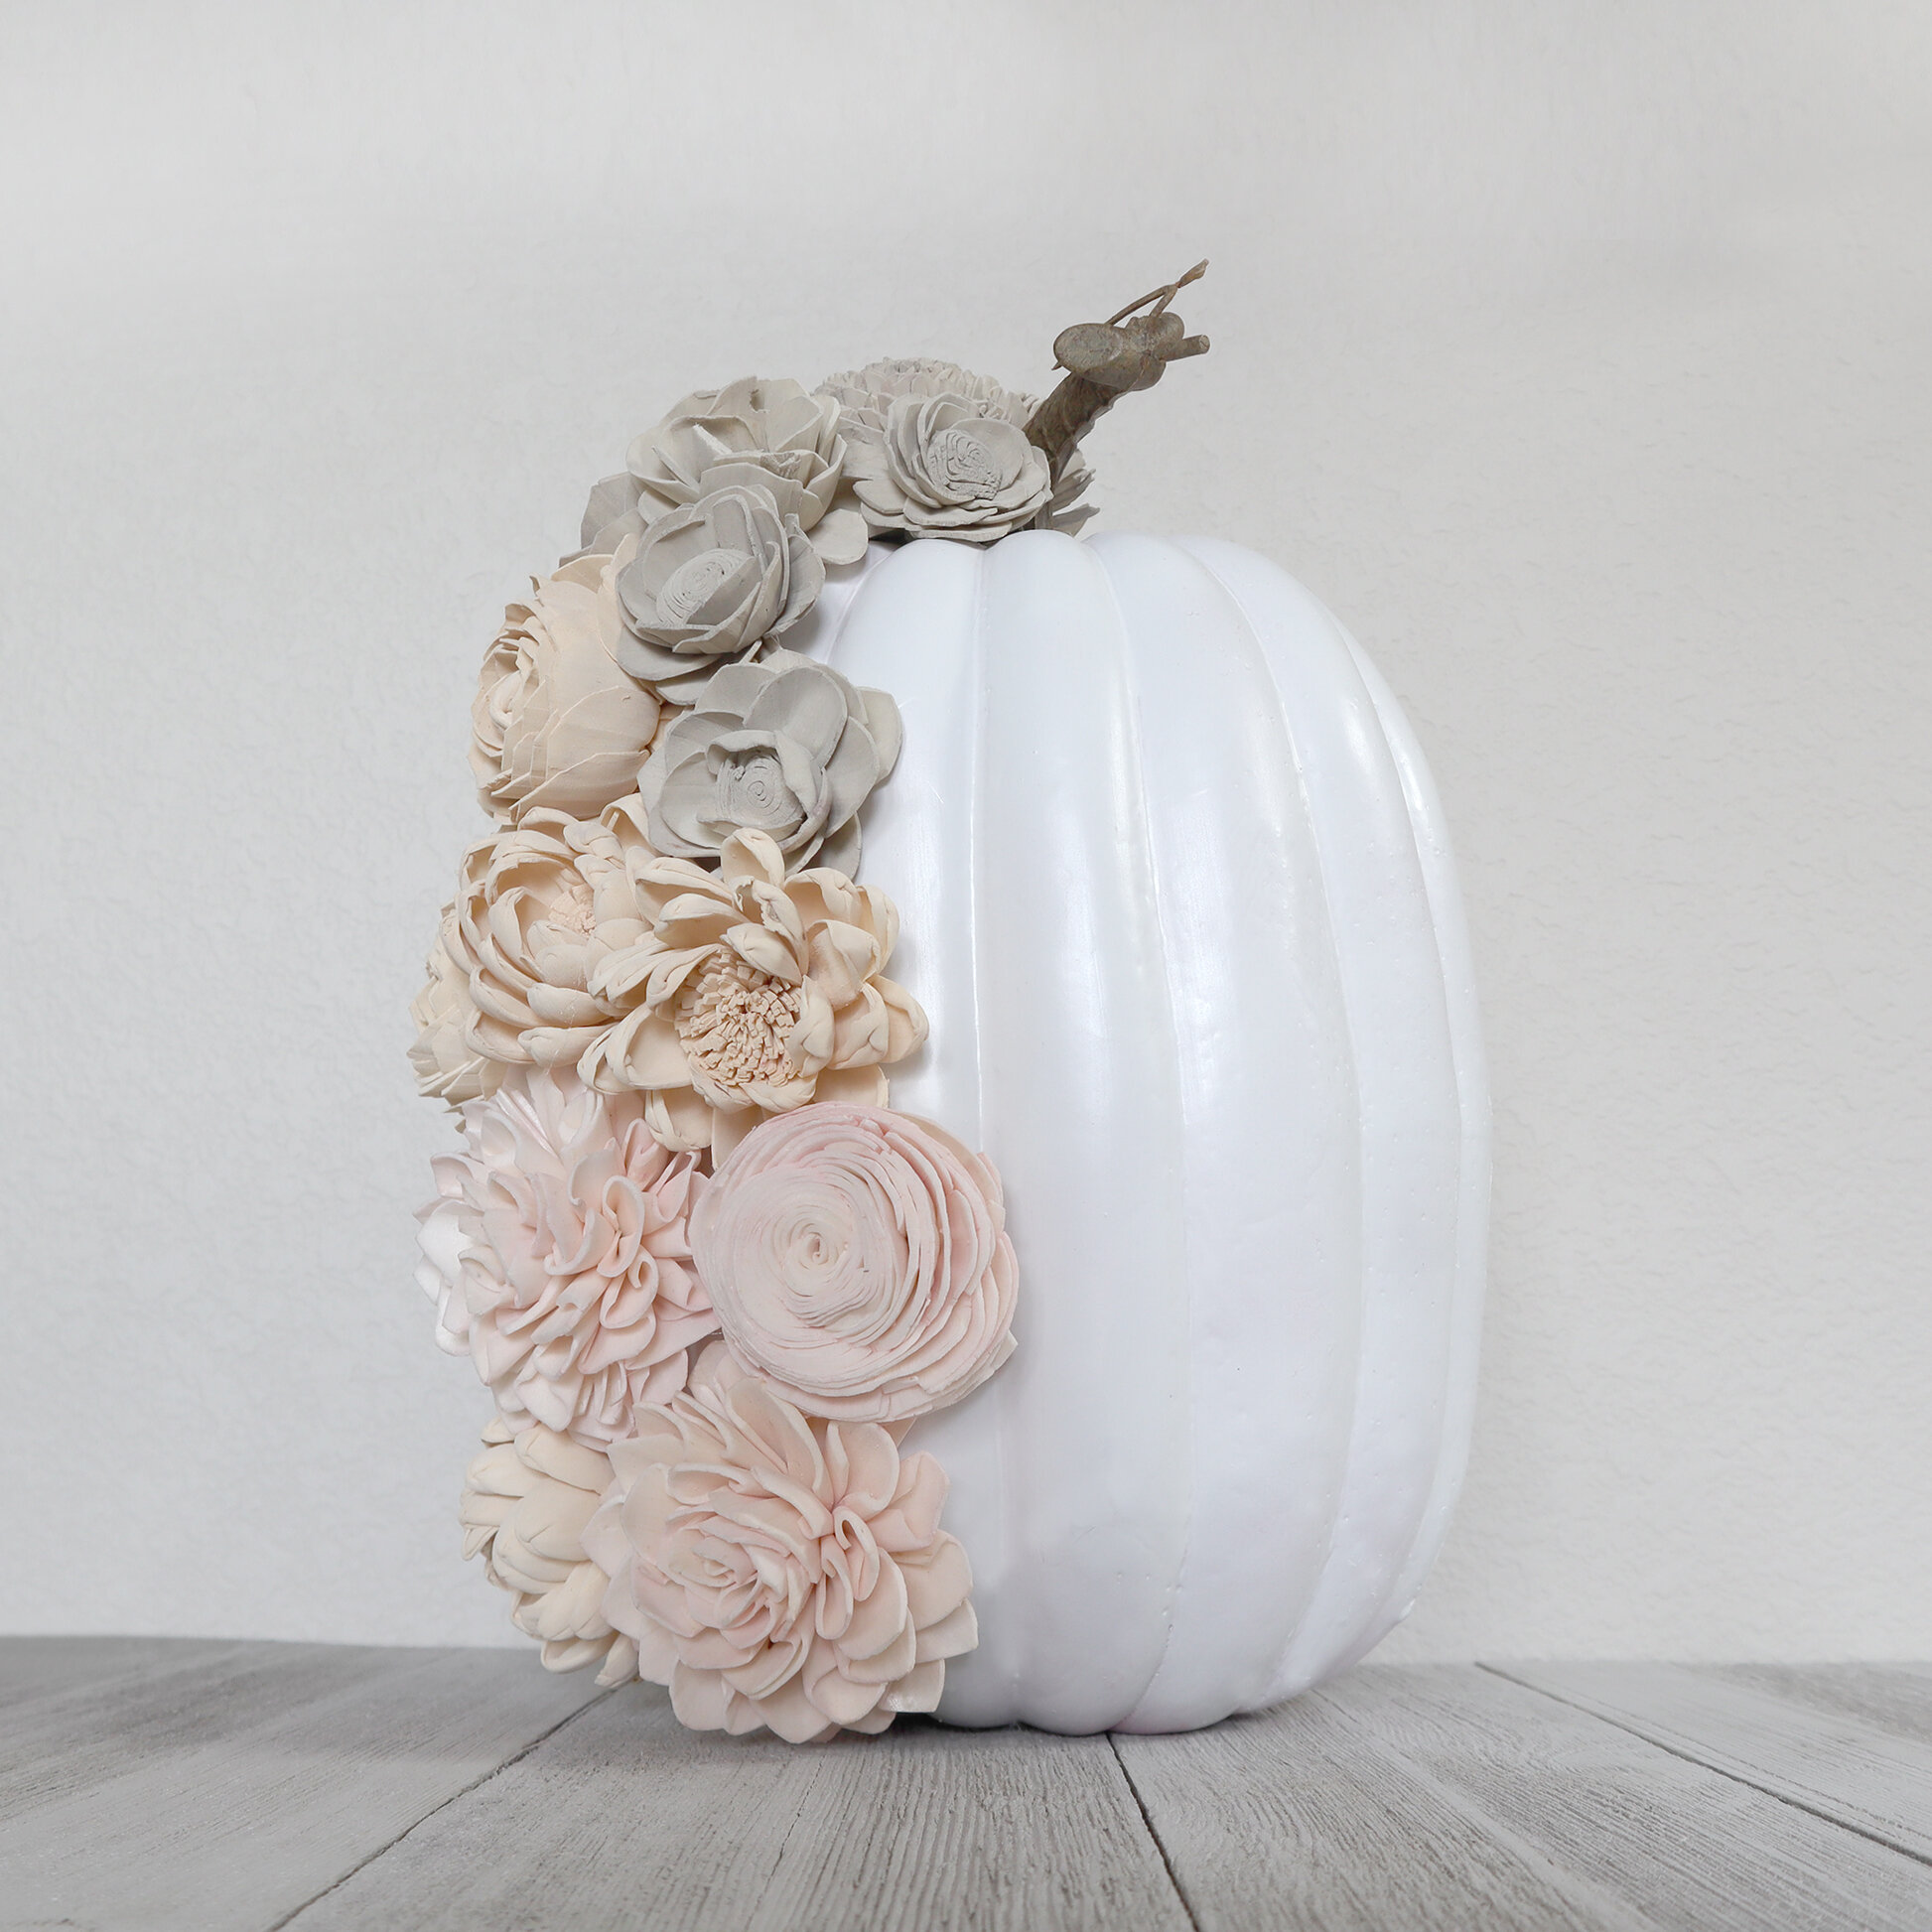
Last year, I hand painted this pumpkin to give it a little dimension in a pretty soft orange, but I think for today’s project, we want a flat white look, which will be really crisp looking with our flowers.

We will mask the brown stem with some tape before getting the spray paint going.

Now that we have the pumpkin painted white, we need to decorate it with flowers.

I want to show you these 2 wood flower assortments that Sola sent me. I’ve made flowers out of paper, but have never seen flowers made out of thin sheets of wood like this. They are so beautifully made.
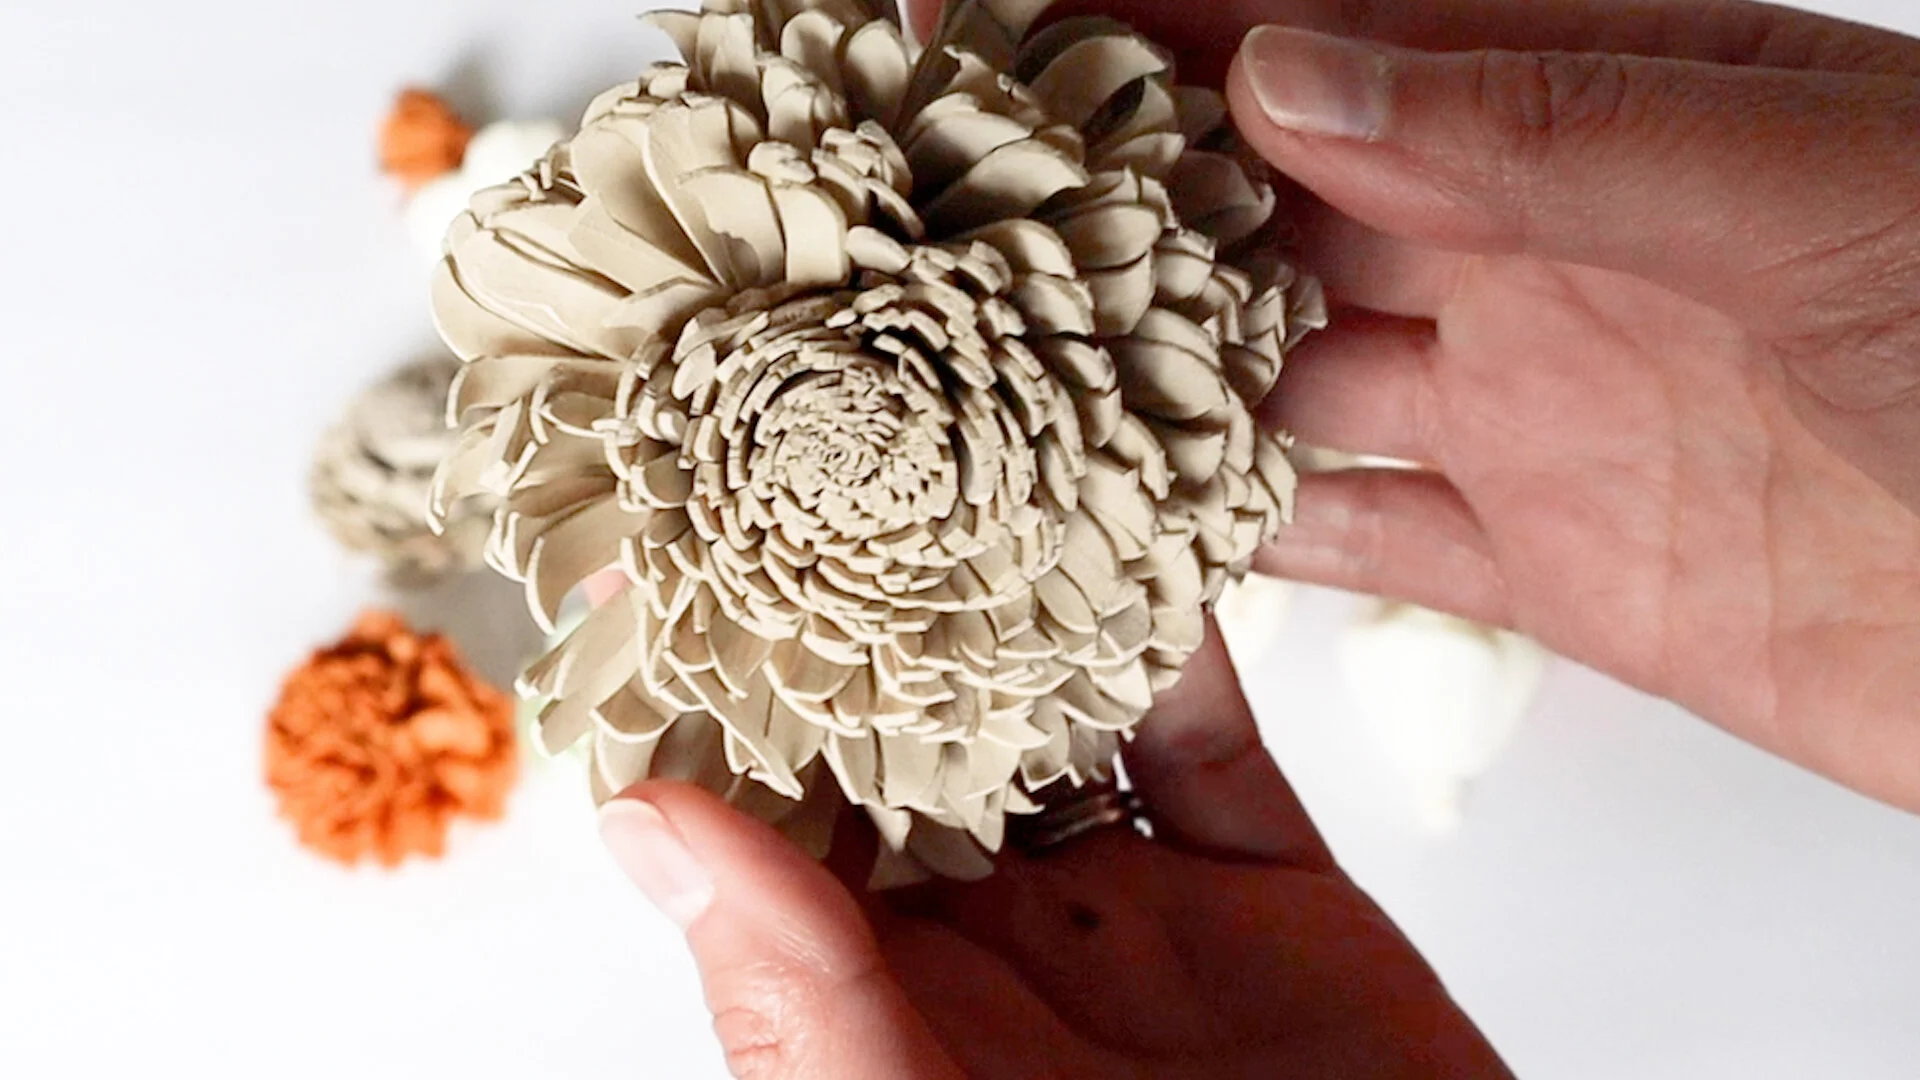
The first package is the Sola “Cottage Hill” assortment. I’m definitely getting Fall vibes from this set. It has some gold flowers in there that would be beautiful for Fall DIYs. And lots of neutrals, which are great for decorating anytime of the year.

These are very detailed and realistic looking. They are lightweight and kind of feel like thin foam. I was worried they would be too delicate to work with, but they feel really sturdy and work well with my hot glue gun to stick to pretty much any surface.


There were even a few with their natural wood finish.

And then this is the Sola “Little Bo Pink” assortment. You can see there are a few shades of pinks and then some more neutrals and a few in the mint green. The assortments are nice because you get not only a variety of colors, but also shapes and sizes. More to play with!

So, let’s see what we can do with these. I’m wanting to do an ombre effect on the pumpkin, so let’s organize some of these Sola flowers from lightest to darkest.

All that’s left to do on this is hot glue them in a flowing pattern down the side of the pumpkin. To get this cascading pattern, I start at the top and then make a curved line down the middle.

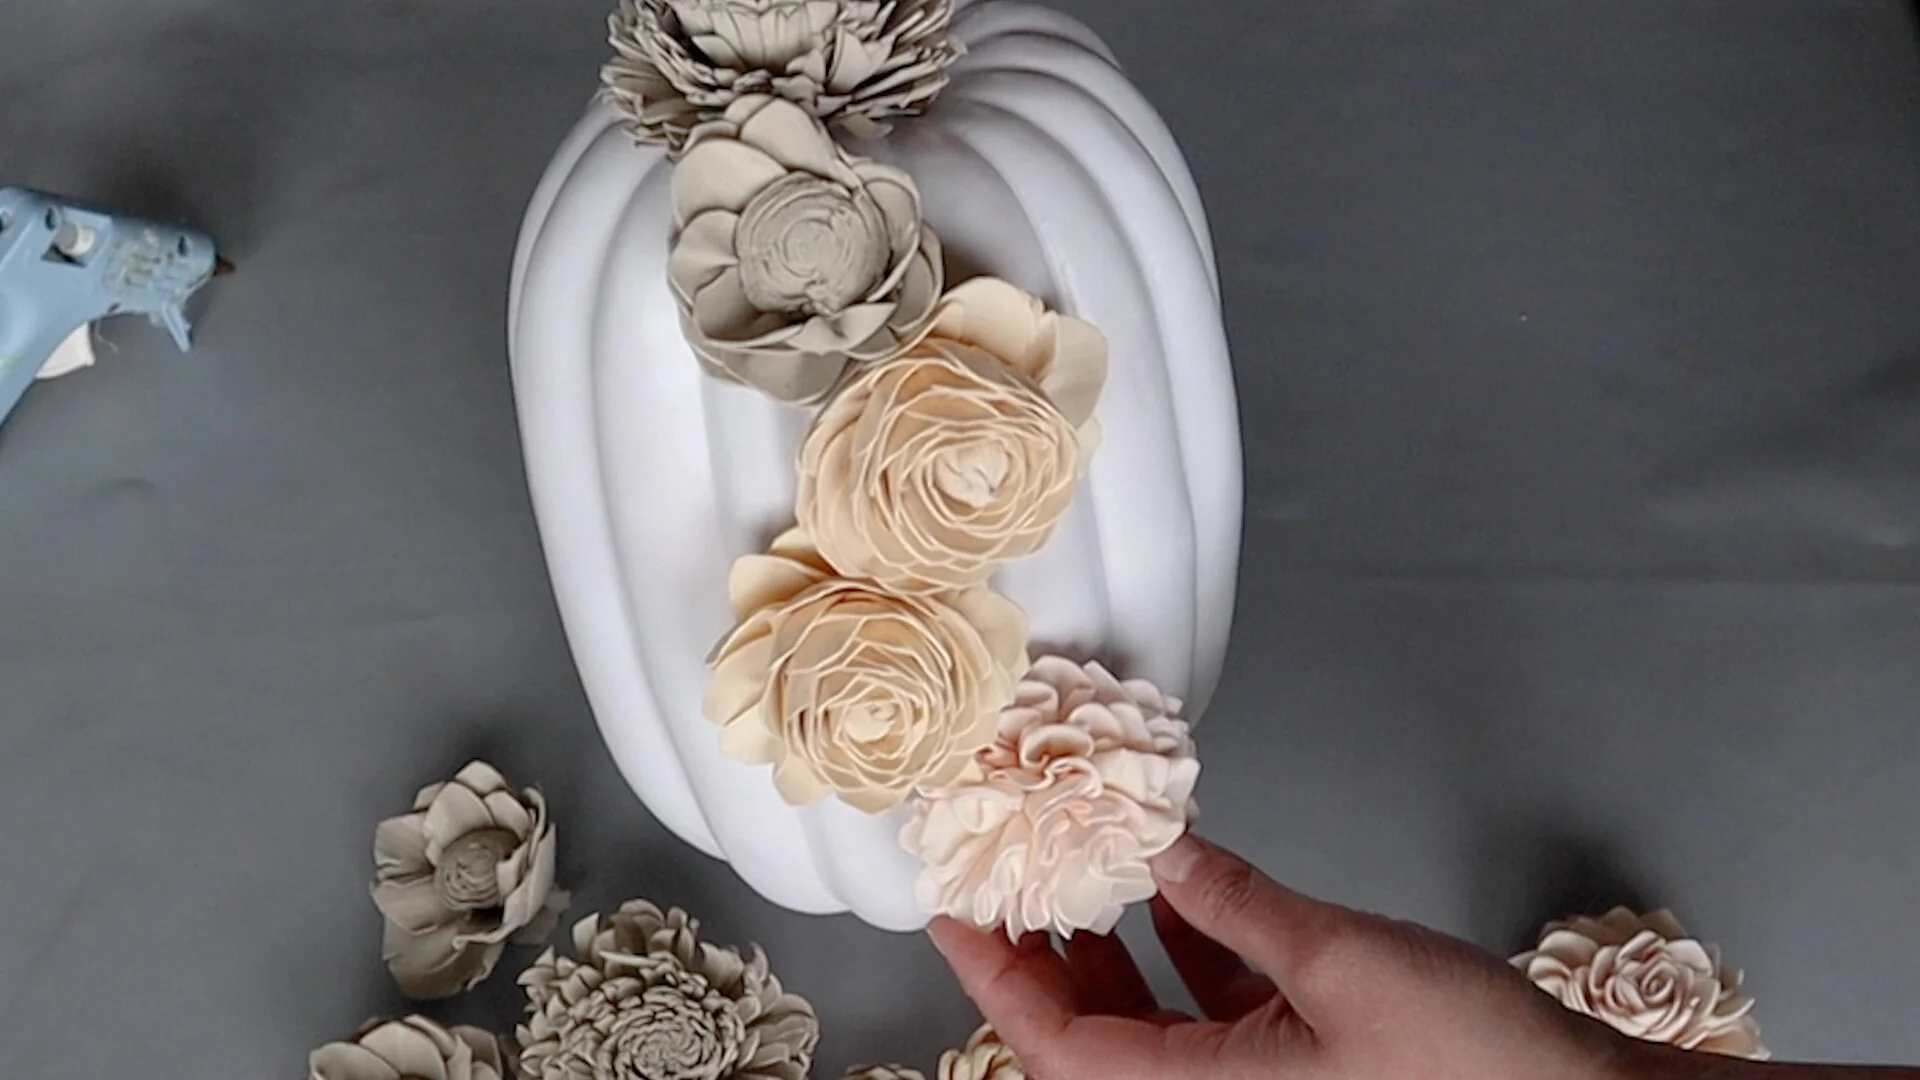
Then I add the florals to the sides to finish off the floral waterfall.
I’m looking at it from different angles as I go along to make sure it doesn’t have any empty looking areas on one side.

This first DIY was the easiest, but it looks like something that you would pay a lot of money for. I think the ombre effect and neutral colors is what gives this a high end look.
// hula hoop wreath
You can find these smaller hula hoops at the Dollar Tree. I’m going to give one side a light coat of white spray paint, so that when we wrap this with raffia, there won’t be any show-through of the colors behind it.

This raffia is actually from a hula skirt I found at Dollar Tree last Summer. I’ve used it for lots of different projects and it’s lasted me a really long time! You get a lot of raffia for just a dollar.
I’m using about 4-6 strands at a time to cover more ground and I add a dot of hot glue every once in awhile to make sure the raffia doesn’t shift.

When I get near the end of the pieces, I use some hot glue on the back and then trim off any extra pieces. When I start the next piece of raffia, I overlap the last one a bit. I’m mostly looking at the front as we go along to make sure it is evenly covered with raffia. Continue wrapping until you get all the way around.

Now we have this hula hoop, which looks nothing like a hula hoop anymore. I love how the raffia added this beautiful neutral colored texture to the hoop.

I had a leftover sign from Valentine’s Day and am painting this with chalk paint.

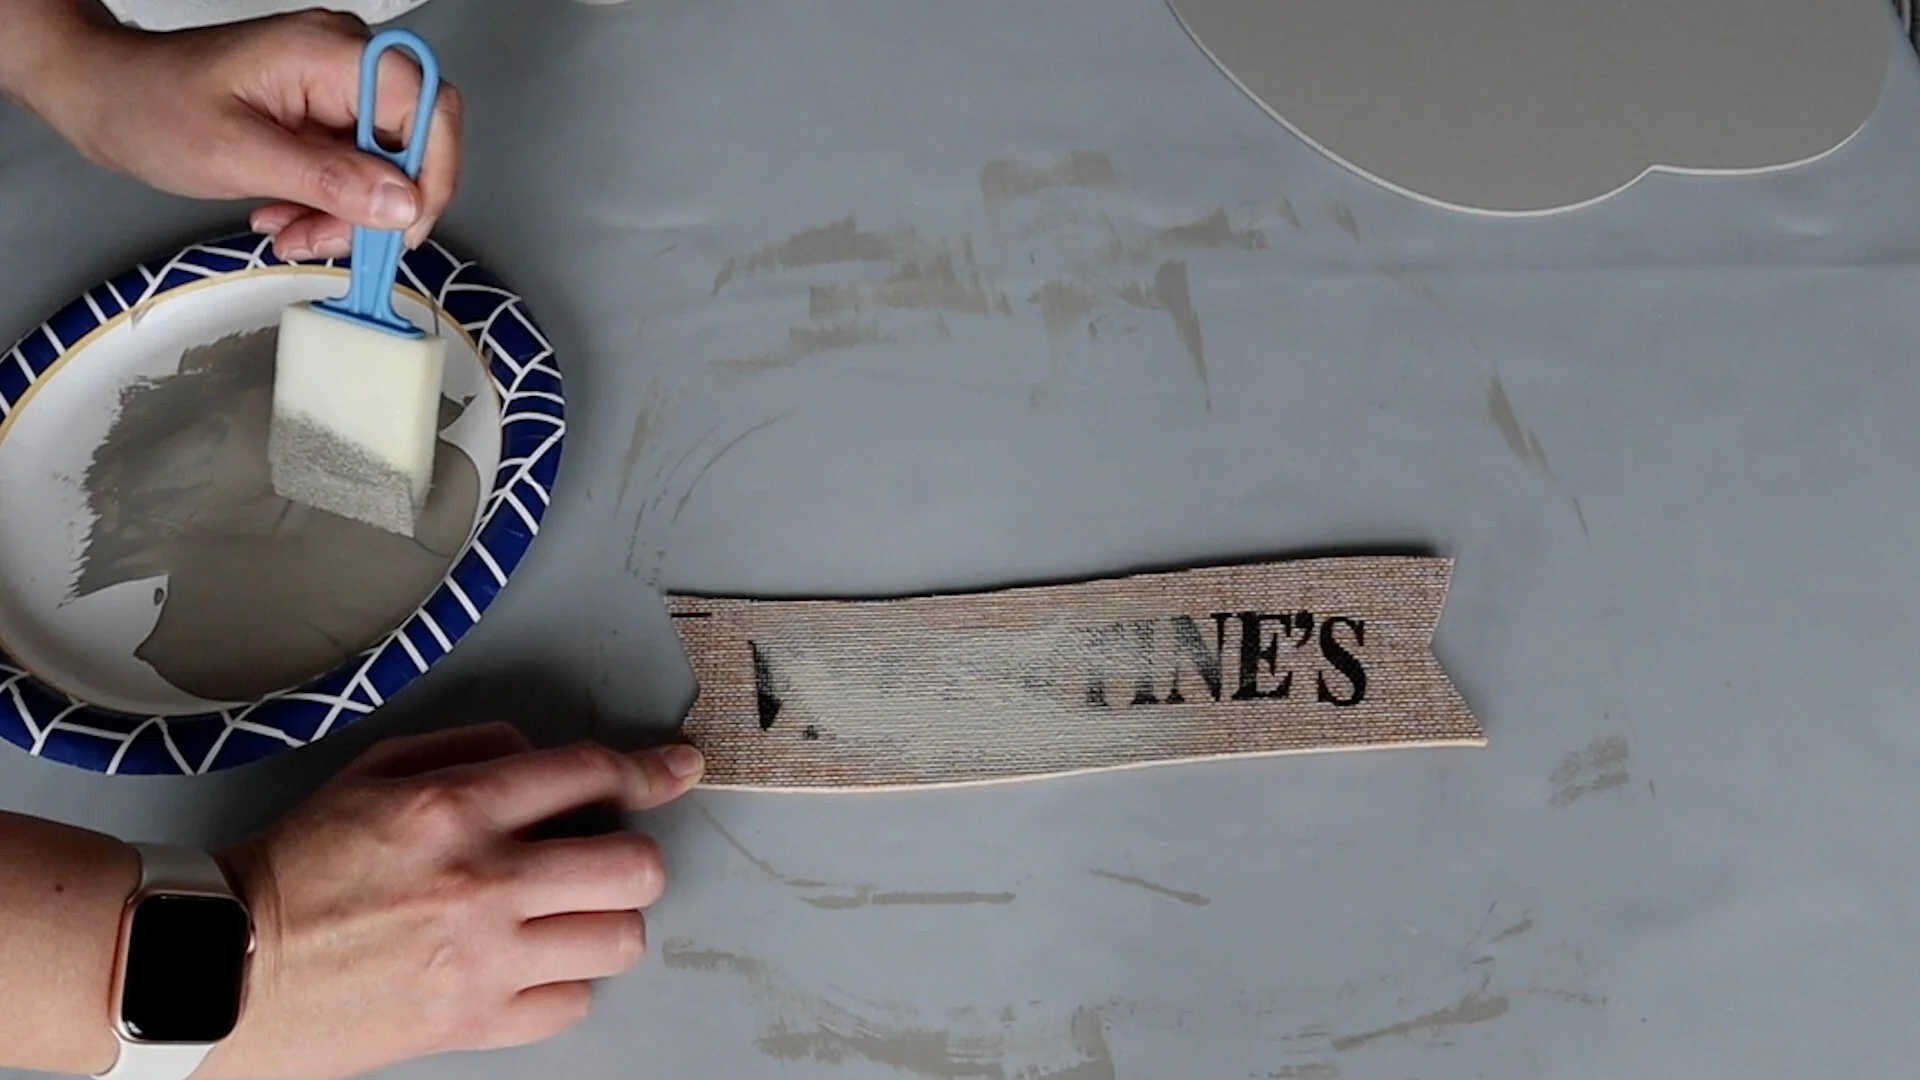
You can find these gold rub-on transfers at Dollar Tree. They have a wide selection of rub-on transfers in different colors and styles of fonts. I’m going to cut out the words “Fall Vibes”.


I cut a piece of Dollar Tree poster board a little smaller than the actual sign, but in the same flag shape.
The rub-on transfers are really easy to use. You peel off the clear backing, then use your fingernail to press the transfer onto your surface. You are left with beautiful typography - no Cricut needed!

I added some foam stickers to the back, to give this a bit of height and stuck the poster board sign to the linen one.

I’m going to use a combo of floral wire and popsicle sticks to get the sign and all the flowers on the hoop. I want the design focused on one corner, so all the support will be there.
I used a variety of Dollar Tree florals and the Sola wood florals.
The hot glue sticks really well to the wood and the raffia, so this will be pretty sturdy when we’re done with it.

And here is our finished Fall wreath! Beautiful and high-end looking, for such a low cost!


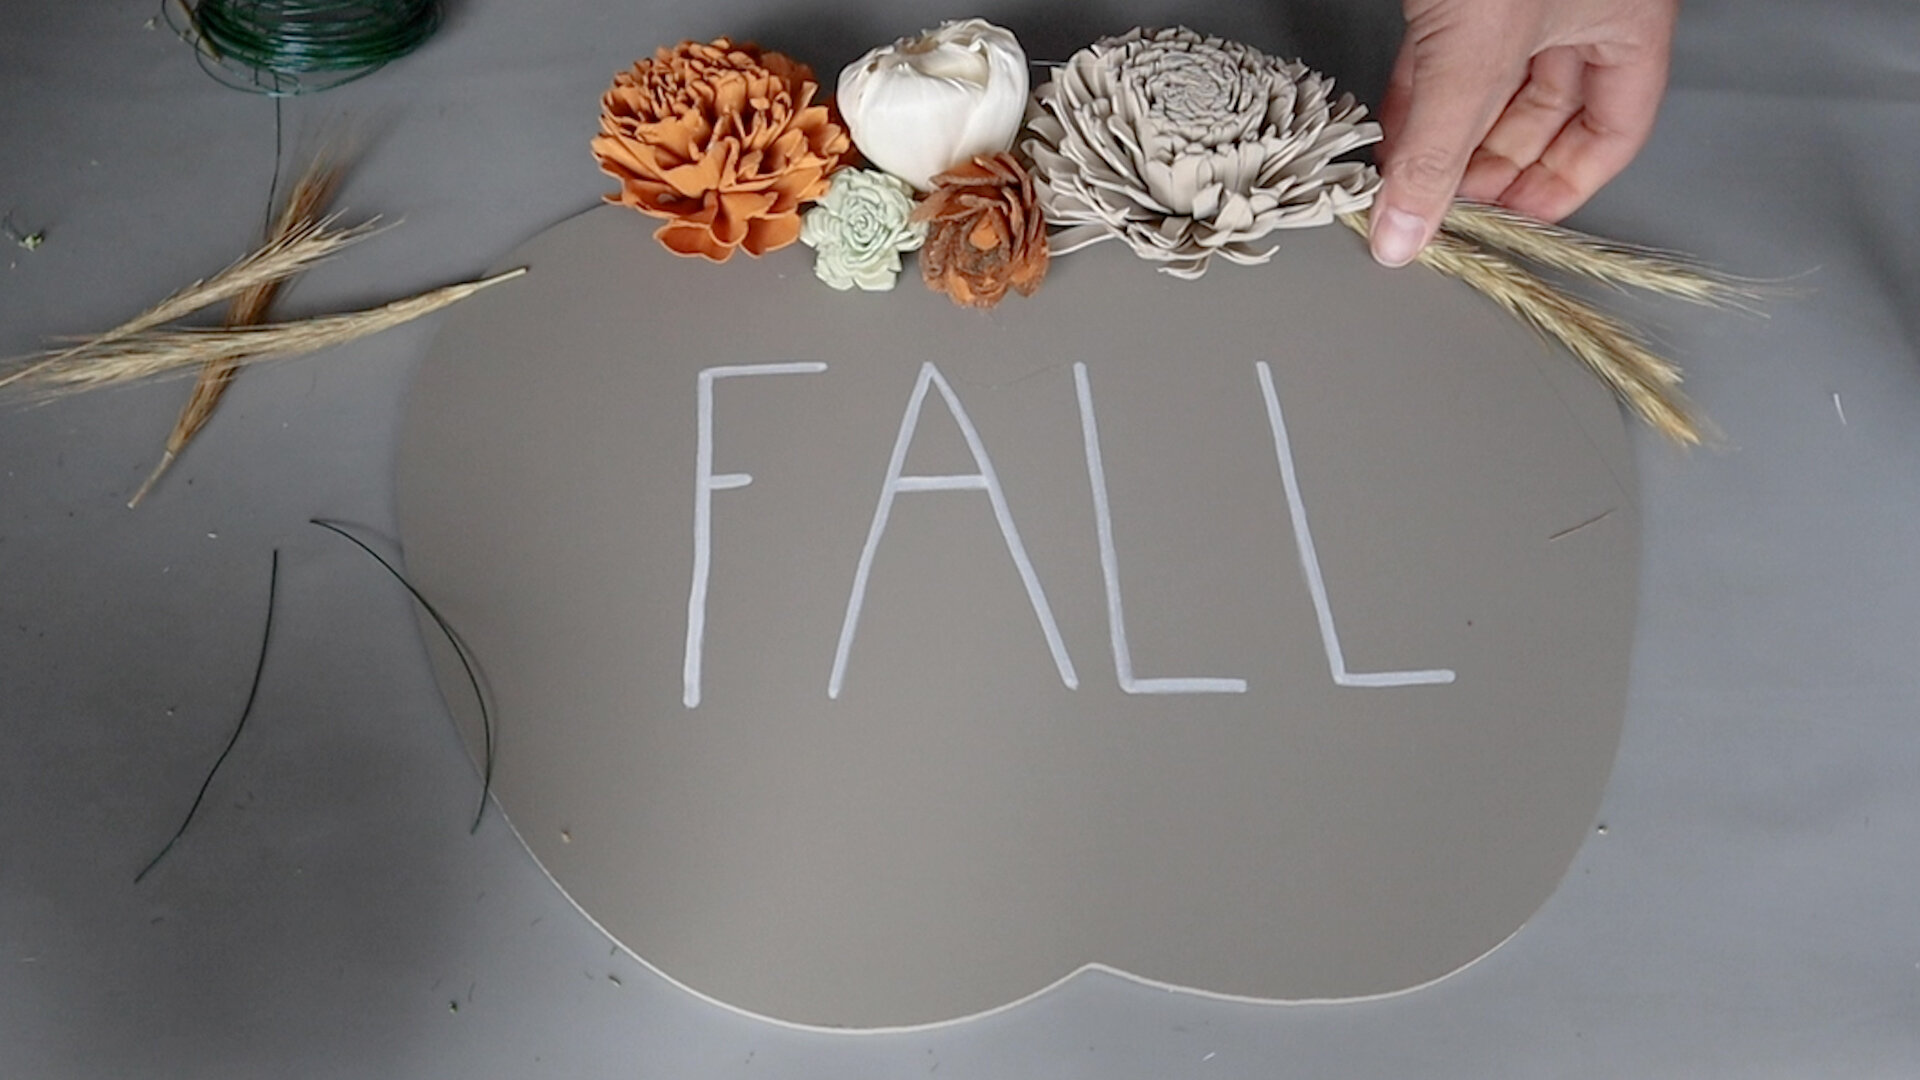
// dollar tree pumpkin sign makeover
I got 2 of these pumpkin signs on a recent trip to Dollar Tree. You could double up the size of this sign by overlapping two or more of these pumpkins, if you’re going to use this on your front door or on another large space.
I’m going to use this as decor on a shelf, so I think I’ll just stick with one of these pumpkins.

Let’s use some of this greige chalk paint in the color “Castle” to paint the back of the sign. The front had a few dings on it, but the back is nice and smooth.

I added a piece of Dollar Tree contact paper to the back to cover up the other design. It doesn’t have to be perfect, but just in case anyone sees the back, it will look nice and it will also ensure none of the black paint scrapes off on the wall.

I wrapped some of that raffia skirt around the stem of the pumpkin.

We’re going to add the word “Fall” to the front. I don’t have a Cricut or any type of cutting type machine, so I’m going to be brave and freehand this. I will use some guides on the top and bottom, so it doesn’t come out lopsided.
I’m doing a really simple and thin font, so this shouldn’t be too hard.

After going over it a couple times with my white chalk paint pen, I think it came out pretty good.


These wheat branches were something new at Dollar Tree, so I picked up a few of those. I’m going to use these in combination with the Sola wood flowers. I wrapped the twine into bundles with floral wire and attached them with hot glue, behind the other flowers.
The bottom seemed a little empty, so I thought this ribbon from Dollar Tree would dress it up and I like how you can still see a bit of the paint color behind the ribbon.

And here is our beautiful Fall sign, made for just a few dollars!

Don’t forget to check out Sola wood flowers web site, they have lots of different colors that I didn’t show in this post.
Thanks for stopping by and I hope you have a creative day!


FTC: Not Sponsored. All opinions are always 100% honest and my own. Some links may be affiliate links. If you click a link and buy something, I receive a small commission for the sale. It doesn’t cost you anything extra and you are free to use the link or not as you choose. If you do use my links, I appreciate your support.
How about some Target Dollar Spot crafts and Dollar Tree coastal transformations. We’ll be putting together tiered tray miniatures to decorate our little coastal vignette.